Anyone have any tricks or tips for pulling an engine from a 39 pilothouse? My project is moving along and its time to pull the old perkins. My issue is the spiral staircase. The hardest engine pull to date for me are boats that don’t allow a crane line directly through the companion way hatch for a straight up pull. Its not too hard to lay lumber on the stairs and drag it until it can be lifted. I’m not seeing an easy way to do the same with the spiral stairs of the 39ph. Plus the yard guys use a giant forklift instead of a crane. Its good for up and down, but other maneuvers are clumsy at best. I’m envisioning I’d be below guiding and end up banging around and taking out the curved side of the staircase… So far I was thinking about renting a basket crane for more ‘delicate surgery’, but not sure how to best protect the starcase. Or am I just getting too nervous and over thinking?
Thanks in advance,
Dean
Hi Dean, I have been asking myself the same questions. I have had the gear box off and engine raised enough to change the sump gasket standing on my head, and I rigged a basic gantry to do that. However, if I was to try and remove the engine entirely i would make a triangular frame with three vertical legs. The legs would be round with a series of holes so they could be adjusted to suit the heights of the cabin sole and steps. Using two Yale blocks the engine could be moved around in the frame and rested on blocks while the frame is repositioned, inching towards the companionway.
Of course this assumes that the engine complete will fit through the hatch. I notice that my engine was purchased two years before Fyne Spirit was launched so I suspect the boat was built around the engine. It may be that the engine would have to be partially dismantled to get it out. Certainly I would expect the gear box would have to be removed along with heat exhanger, alternator, exhaust elbow, exhaust and inlet manifolds. The 4.108 is probably a bigger engine than my M50.
It was great to have a look at that F39PHS you mentioned in your other post. I note she had two winches and they were only 27s. Our single 43 is working hard to get enough tension on the luff of either sail. How does he get away with such small winches? I am just in the process of replacing our winch with a new Lewmar 45EST electric winch - what luxury!
Cheers,
Mike.
Don’t know if this is relevant but years ago I replaced an engine in old Bristol 32 sloop. I used tackle from the boom to move the engine from the dock over the companionway and down and rigged a separately tackle to a board across the companionway and with the ability to move sideways with the boom and up and down it was quite easy to work that way. In my case it was straight pretty much straight down to where the engine would be mounted but it was also easy to attach tackle to move it forward or back.
I am sure that TPI dropped the engine in prior to adding the deck/cabin roof. But it should fit through the companion way, I think. I did ask Paul Dennis in passing since it was when I thought I would use the existing motor. I am going to take some careful measurements and maybe use a cardboard box for a dry run. Yes, I’ll be removing ancillaries and building a gantry in the cabin. And I’ll have to skoot it over to the companion way. I did have an idea while working on other stuff yesterday. Maybe if the engine is upended by lifting from either the front or the bell housing it will slide on boards placed on the stairs. The other option is to remove the stairs… Not sure if I want to do that mostly due to extra work. But if necessary, now would be the time since the stairs and cabin sole are just about the only things remaining.
On a side note, Mike, I have two winched same as Quaker II. And boy do I wish I could upgrade to electric (budget for the build). Maybe in a year or two. The only thing we did not like about her was the forward head layout. We think ours is nicer since the toilet is tucked against the v-berth bulkhead. And no mention about the nav station wheel? I thought that was interesting and am even toying with setting up to add to mine. Not sure how useful, but looks pretty cool. Oh, and another side note. Quaker II has a massive 3" exhaust using an inline check valve located in the bilge midway to the aft compartment. The exit is on the port side near the transom just above the waterline. I think I replace the small thru hull but use the same location which is more below and less visible.
-Dean
I just did this kind of job with my F44. I pulled 500 lbs., 4 cyl. yanmar out and also there were no direct way to hoist the lifting line. I had to pull engine a couple of feets forward and couple of feet to the side before actually pulling it up. I ended up stripping the engine all the way to almost bare block. Frightening at first but completely doable…
In my case the biggest obstacle was to collect all the necessary parts. Yanmar = Japan = very expensive parts = long waiting time 20-25 business days strait form Japan ![]() ) + obsolete model + sales persons know only the price tags and nothing else , it means even more mess with correct parts numbers/ handling => even more waiting time. Once while waiting for my part order in local dealership I observed that all new Yanmar diesel engines were made in Italy … oh, this magic word “marine” !
) + obsolete model + sales persons know only the price tags and nothing else , it means even more mess with correct parts numbers/ handling => even more waiting time. Once while waiting for my part order in local dealership I observed that all new Yanmar diesel engines were made in Italy … oh, this magic word “marine” !
I did take out and reinstall twice my Perkins 4.108 whithout problems, see pictures attached. Just tilt 45 degrees transmission low and put a blanket around the hatch and a piece of plywood to protect the lower stairs. Pull in as it is coming down, piece of cake ![]()
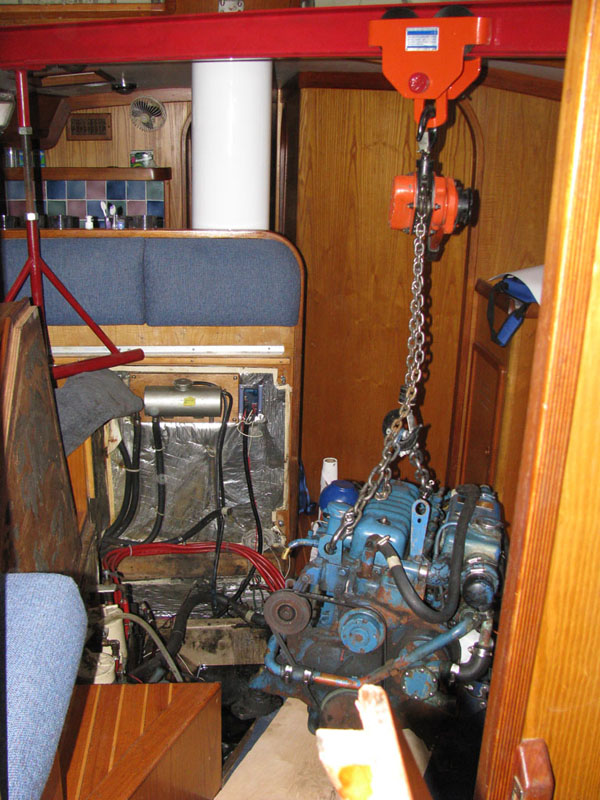
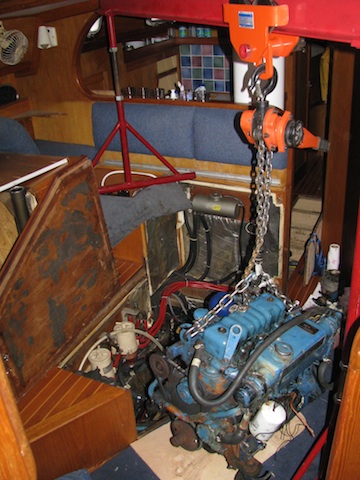
Alain, pretty fancy gantry. I really appreciate the pics, they really help. I think the trick will be to position it on the lower stairs so the crane pickup point is close to straight. I plan on using plywood on the stairs and ramboard (thick cardboard used for floor protection in construction) to protect staircase sides. Interesting you pulled complete with tranny. I was planning in removing while below to both lighten and reduce size. But mating tranny to new engine would be faster and easier on the ground. I’ll have to give it more thought.
Nice one Alain! Great to see the pics. Like many jobs I guess, once you get started it’s not always as difficult as you would think.
Dean, I did notice the inside steering position but it didn’t look all that practical in a seaway. On Fyne Spirit I fitted a Pilot chair which I can sit securely in, and from it I can see forward and each beam easily, and aft through the companionway. It’s a good watchkeeping spot and I can keep an eye on the radar and instruments, although I have to go outside to alter course. If I wanted to steer from here It would be simple to get a remote control for the autopilot, rather than go to the expense of a complete helm station.
Regards,
Mike, agreed that the second station on Quaker II is not very practical. You have to sit up on the chart table with a small foot rest below the wheel to keep steady. In tight conditions visibility is not great and I bet that in open waters the motion may make remaining seated difficult. But I like it for the ‘cool’ factor. I was toying with some mods to the nav station design including adding an adjustable pedestal seat. The wife liked the looks of the original seat, so we’ll have to see how it goes. I had not thought of using autopilot remote control. That’s a great idea and very practical, wish I thought of it.
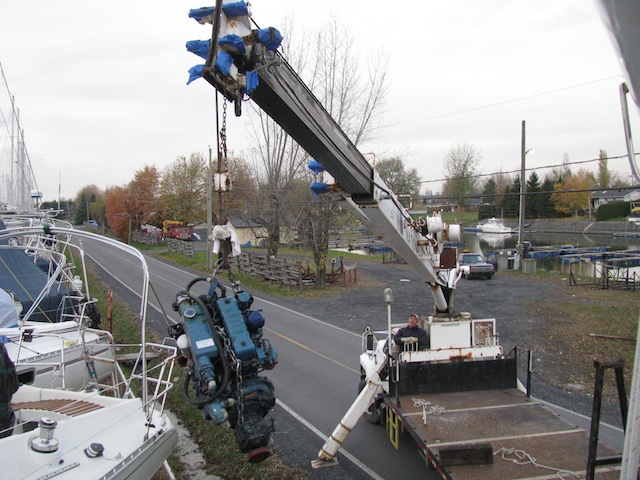
As far as the motor swap goes, we need a few dry days. So much rain lately has the boat yard under a few inches of water and the crane will not be stable. the new motor should arrive early next week. With setting up the gantry below and pulling the parts to be added to the new motor it all should go smoothly. Plus I get to clean out the engine tray and bilge area that the motor/tranny make near impossible. Yucky work, but worth the effort.
It sounds like you bought a new or reconditioned long block? Can you tell us a little about that?
I’ve just made an adapter so that I can check the compression on our motor and make the thumbs up/down on rebuild or not.
George
George, yes it is a rebuilt. Sold as a complete engine since small diesels find many applications (farm, industrial, marine…), but usually referred to as a basic or a long bock since all marine specific items and ancillaries need to be added. Although the rebuilder does include a new starter. My exhaust manifold/heat exchanger is in excellent shape except for one hose nipple has a little metal missing. I think I’ll need to move the oil changer siphon (and oil pan). And I can give the water pump the once over. I would have preferred pulling the existing motor and rebuilding myself as a winter project, but the boat was locked in so a crane could not get access until recently. Plan ‘b’ was to get it running since this season (if it happens for us) will be quite short, and then rebuild this coming winter. But it looks like I need to invest a lot more time and effort to get it running. When I purchased the boat I was told by the owner that he had it running, which I really doubt. Later I found that the yard folks had to cut a whole to drain the water since the cabin was flooding while on hards. I don’t think the engine was submerged and it does turn by hand. When I found that cranking with the new starter was too slow to attempt a start (or even a compression test) and the starter removal revealed a rusty slush in the bell housing, I knew a replacement was the only hope for any action this season. The fellow who did the rebuild is in WA and ruan it for over ten hours to begin ring and valve seating and confirm oil pressure at idle and 3000 rpm along with water temp stability. He also seemed rather knowledgeable about the Perkins (not just general diesel know-how). So I fel pretty confident in quality. The total cost including shipping was not much more than a full rebuild kit. So other than missing out on the fun of the rebuild, going this route is pretty much a no brainer. I saw other rebuilts for almost double the price and, of course, new is even more expensive. So I think I will be real happy in a couple of weeks when the swap is complete. I’ll send an update once I know she is up and running. BTW, I too was in the process of making a compression tester adapter from an old atomizer, but since I was barely cranking, it went to the wayside.
I have a bunch of parts behind the shed. If you want a new whatever it is that’s missing metal just let me know and I’ll take a look see. Also if you could, I’d like the contact info on the guy in WA.
Thanks
George