I am approached frequently to advise Freedom owners on the repairs, modifications, and upgrades to Freedom Yachts and their rigs. Many of these inquiries involve the circumferential cracking that occurs specifically on carbon fiber masts built by TPI. Usually they are of little structural concern, but they are a nuisance to have to look at all the time, and if left unattended over a long time, they can lead to more serious cracking. The cracks are repairable. With the help of some Freedom Yacht owners who have been through the repair process, I wrote up the attached paper called FREEDOM YACHTS MAST CRACKING–CAUSES AND THE CURE. It describes the nature of the problem and how to fix it, with a repair drawing and photos of a repair procedure. You may download this and pass it around.
I hope this is a benefit to all Freedom Yacht owners. If anyone has specific questions or would like further advice, you may contact me directly.
Just a thank you for posting this repair procedure here for the benefit of all us Freedom Yacht owners. I have had concerns about my own masts cracking (1982 F-33 CK) and it is good to know that a good repair procedure is available. Your work in developing this and preparing this article is appreciated.
Eric, I want to join the others and thank you very much for the very interesting and informative document on mast repair. I happened to own F44 centerboard and thinking to repair my masts myself one day. I just wanted to ask your advice on few more points. My F44 has already gotten single ply sails with original sail tracks consisting of several sections riveted to the mast so I’ve noticed that those cracks situated exactly where the sections of track come together. As far as I understand I have to remote the tracks with the rest of hardware , put 2 glass layers around te mast and somehow secure track sections back into exactly the same rivet holes after mast repairs completed. I think that might be diffucult after all the fiberglass layers , fairing and painting and I am not so eager to drill new holes in the masts. just wondering how to align track sections exactly into the orignal holes .
Also my mizzen mast had radome installed approx. 20 ft. high from the deck. It means my mast got 5 more holes: one is an ugly hole about 1”+ inch in diameter for the cable and 4 holes for the radome bracket… so it seems to me that all these holes together with sail track holes represent something like ‘weakening band’ approx. 20 foot up the deck . perhaps I am over concerned about it , does it make sense to repair these holes as well .
Eric, what is most appropriate way to repair these these holes ?
RDS, the cracks in way of the sail track joints are probably more of the same as other cracking and are not specific to the track joints. Once you remove the tracks and repair the surfaces of the masts as described in the repair document, you’ll cure the problem entirely. You can put the tracks back in the same locations and use the same holes. You might have to go up a size in the rivets simply because drilling them out may damage the holes in the mast, leaving them slightly larger. To remedy this, after you have stripped the old gelcoat down to the fiberglass winding layer, fill all the rivet holes with epoxy high density filler, such as you can get from The Gougeon Brothers (WEST System, product #404). Then apply the glass overlay, covering all the holes up. Paint the masts and reinstall the sailtracks, drilling new holes the same size as the originals. Most of the holes will go through the filled holes, but high density filler is rigid enough to effectively “rebuild” the laminate for the new holes.
As for the radome, yes, the holes would conceivably weaken the mast, but I have never heard of a Freedom Yacht mast failing at the radome holes. However, if you would like to add some reinforcing to the mast during your repair, then after the new glass layer that you put on, you can laminate some new carbon fiber cloth over the glass up to say and extra 3/16" to 1/4" thick in way of the holes, tapering down to a single layer say 12" above and below the center position of the radome. Cover this layup with one more layer of glass cloth. Sand, fill, and fair for paint, dressing the extra lay-up nicely for a smooth appearance.
If you would like any additional advice, you can contact me directly. I hope that helps.
Eric:
My wife an I own a 1979 Freedom 40 CC, hull number 16, called Beyond. I hope you can offer some advice on mast repair and track conversion.
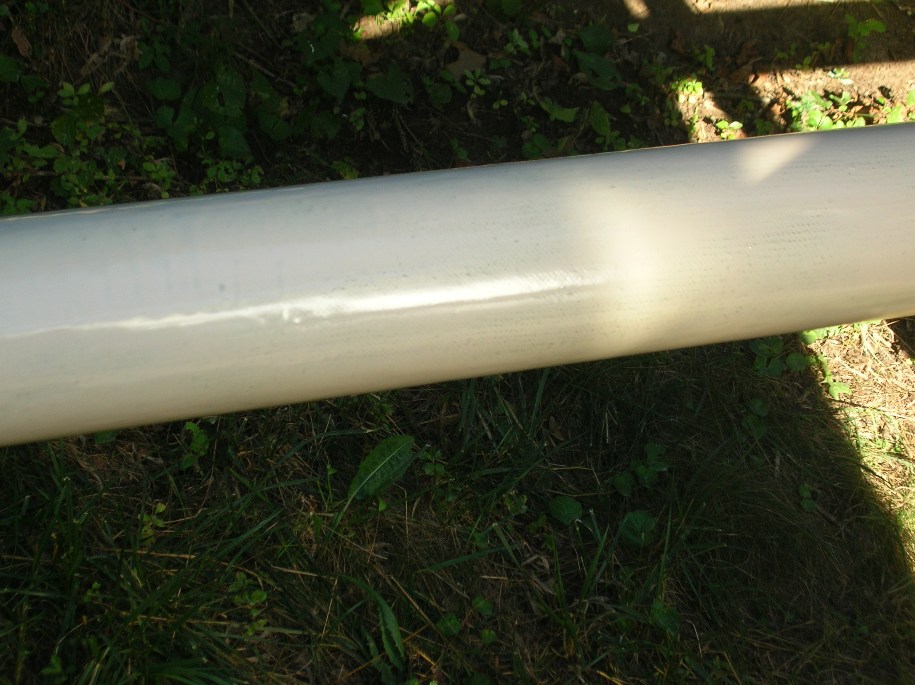
Our boat has the original wooden wish booms and wrap around sails. The previous owner had TPI replace the original aluminium masts with carbon fiber in approx. 1990. These masts have small hairline cracks that go around the masts. These I want to repair, as you describe in your repair procedure and we need to know where to obtain the repair socks and other materials required.
In addition, we want to convert our wrap around sails to tracked and intend to use Tidesmarine tracks. I have read various cautions and warnings about drilling holes in carbon fiber and want your opinion on using adhesive only, as described in this account:
Also, as we intend on continuing to use our wish booms, we need to suspend the booms from the mast (Nonsuch style) and wondered what you thought about how this could be accomplished. We have contemplated drilling through the upper part of the masts and installing a stainless through bolt, from which we can suspend stainless wire cables.
Lastly, do you have a recommendation for weatherproofing the wooden booms? We thought we might remove all varnish, epoxy and paint.
We would appreciate any advice on insight you can provide.
As to the Tides Marine track - I’ve sailed with it on Wyliecats and think it is great. I am quite sure though that it can not be glued on given it is made of a UV stabilized UHMW plastic. Your link to CTS is for a much smaller mast and lower loads. I would think for the F40 this type of track will not work. The one issue with the Tides Marine track is that it has a high thermal expansion coefficient, you really need to let it “float” on the mast - and not hold it ridgid. This means using the “CMPE Fasteners”, and only attaching one end of the track directly to the mast. the CMPE fastners get mounted every 4" to 6" - thats a lot of holes to drill. I always though a guide with multiple drill bushings was the way to go - something similar to this http://www.v-drillguide.com/ in design, maybe 2 to 4ft long, and guide bushing every 4 ". Then again, I’m really bad a drilling straight. As to fastening and if you decide to use rivets consider something like this http://www.avdelusallc.com/products/avinox.shtml#specs - These rivets create an extra large head on the backside and rely less on the expansion of the body. I think you can also find them in Monel, which may be more compatible with carbon.
We stripped our wooden boom of all hardware, sanded and put 3 coats of Cetol teak color down. Quite happy with the result.
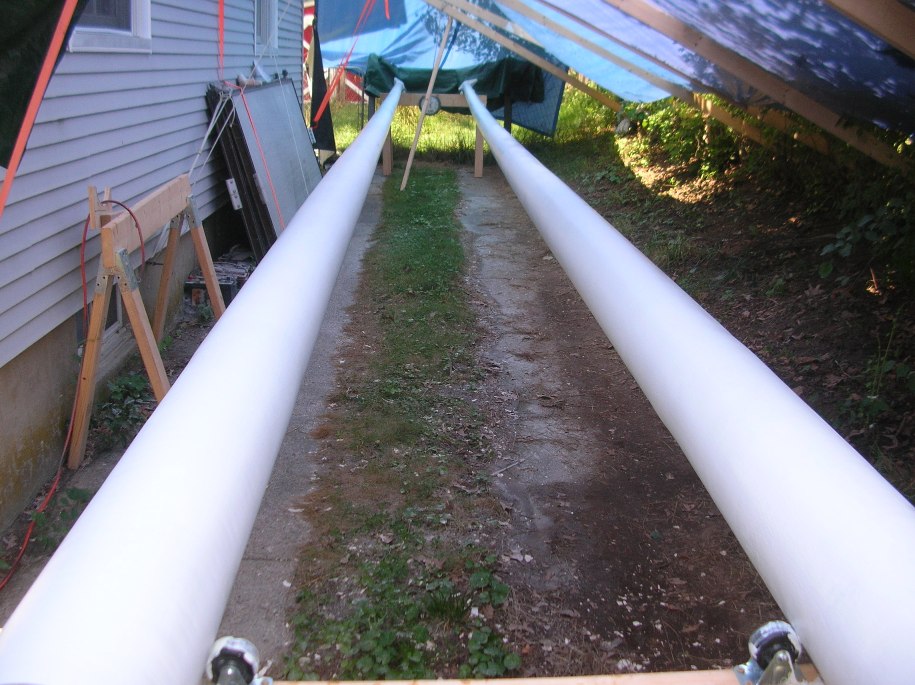
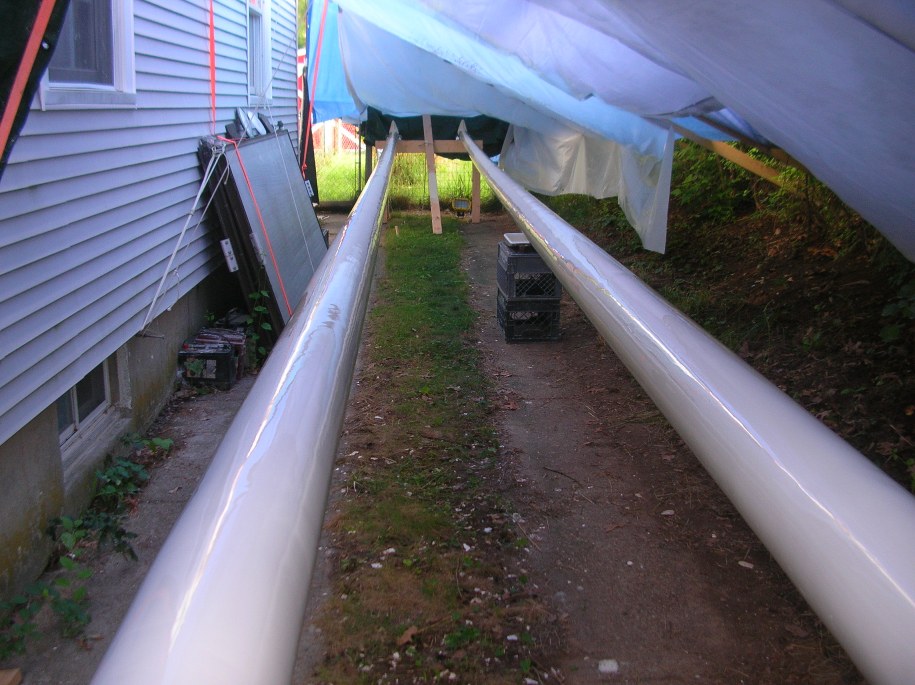
We are the folks who did the repair linked to above…and I’ve got an update. We did the repairs, did primer, had somebody do the painting, and stepped the masts three years ago. I didn’t get sails on them until one year ago, and did a few weeks of sailing after that.
As of now, the repair is holding up perfectly, without the cracking recurring.
My junk sails and other things have scuffed the paint a bit…and my sanding/fairing left a bit of wavy finish. The sock cloth was fantastic and is holding up great. I never confirmed what the sock cloth was. It definitely is not fiberglass. It melts/burns like polyester or nylon does, so Dynel sounds likely.
Now that I’m thinking about how it turned out instead of how long it took, it seems like one of our more successful jobs!
I followed the above directions August 2012 with some additional input from Eric S. and the folks at west system. The sock I used to repair my Freedom 28CK mast was fiberglass which I purchased from: A&P Technology, Inc.595 East Tech Dr., Cincinnati, OH 45245
(513)688-3200 Fax:(513)672-9996 info@braider.comhttp://www.braider.com
They were one of two referred by Eric; I used them because they had the best price for the small quantity I required. After removing all the old finish and preparing as described in the pdf I pulled on the sock DRY and then wet it out with West Epoxy. Since I was working alone and wanted to finish 1 mast in 1 day I called tech support at west system and inquired about their 207 hardener. Turns out with the 207 hardener you don’t need to worry about amine blush so no washing and sanding required to re-coat if it sets up. So I wet out the entire mast several times with just epoxy; then painted on a mixture of thickened epoxy (the WS #407). Another benefit of the 207 hardener is that it holds to vertical surfaces without running. So after brushing on an additional clear coat of epoxy I let it sit. No plastic covering, no peal ply. The results were better than I expected only very minor print thru of the fabric which after minor sanding in preparation for Awlgrip #545 primer and the subsequent primer, disappeared. I finish coated with 3 coats of Awlgrip. This is my first boat restoration and thanks to all the great advice from those in the know; Raven is sailing again.
It looks like you only used one sleeve therefore one layer for the repair. Do you know which sleeve you used? There are a lot of options on the A&P website.
Raven, Im wondering how your masts have held up? The job you did looks great in the pictures. Why did you choose fiberglass over dynel and did you go with one layer of the glass sock or two? I’m aabout to jump in and take the same plunge with Seasops masts. I like the idea of using the 207 Hardner as I was thinking of trying G-Flex but perhaps that is overkill and the west resin and 207 hardner is the way to go.
Whimsy, also intersted in how your masts are doing with the dynel socks.
Any tips, or cautions any one has for me will be much appreciated…I promise to post plenty of Pics! Rick
Can anyone tell me how much epoxy I might require to do each mast? Im noy sure if Ill do one or two sock layers, but I’m leaning toward two using the dynel, unless anyone can provide a reason to do one or to use fiberglass. I’d certainly prefer one layer in terms of cost and work involved but Eric S. says two layers in his procedure. Perhaps using fiberglass sock only one layer is needed? Any thoughts? Thanks, Rick